Welcome, creators and craft fans, to a journey through the art of leatherworking with a modern touch! If you want to create a beautiful and useful accessory for personal use or expand the range of products of your craft business, this tutorial is for you. Join me in this blog. I’ll show you how to cut leather with Cricut and how to create stylish wristlet keychains that are as unique as they are practical. It doesn’t matter what model of machine you have since for this process you can use any model of Cricut Maker or Cricut Explore Air.
In addition to these written instructions, I also prepared a video tutorial on my YouTube channel in case you prefer that platform. I won’t say more! Let’s start with this beautiful project.
Version en Espanol ACA

THIS POST AND PHOTOS MAY CONTAIN LINKS FROM AMAZON OR OTHER AFFILIATES. IF YOU PURCHASE THROUGH ANY LINK, I MAY RECEIVE A SMALL COMMISSION AT NO ADDITIONAL Cost TO YOU.
Video Tutorial: How to Cut Leather with Cricut | How to Make Wristlet Keychains
How to Cut Leather with Cricut | How to Make Wristlet Keychains
Supplies
Cricut machine: learn more about this useful machine at their oficial page or at Amazon
- Purple cutting mat {strong grip}
- Genuine leather
- Faux Leather
- Keychain tools
- 1″
- 1.25″
- 1.5″
- Keychain Tassels
If you wish to personalize them
- Iron On
- Heat Press Machine
Tutorial on my YouTube Channel HERE


How to Cut Leather with Cricut
Working with the Template on CDS Program
Open the Cricut Design Space program. Here you could create your own template or use pre-made templates. I’m going to show you both ways but first I’ll show you how to enter pre-made templates. Remember that you can use my free templates.
Upload the Pre-made Bracelet Keychain Templates
Press upload, then upload image. Open the folder where you have the template saved, select it and press open. You will now have the template in the Cricut Design Space gallery. Select it and press add to canvas.

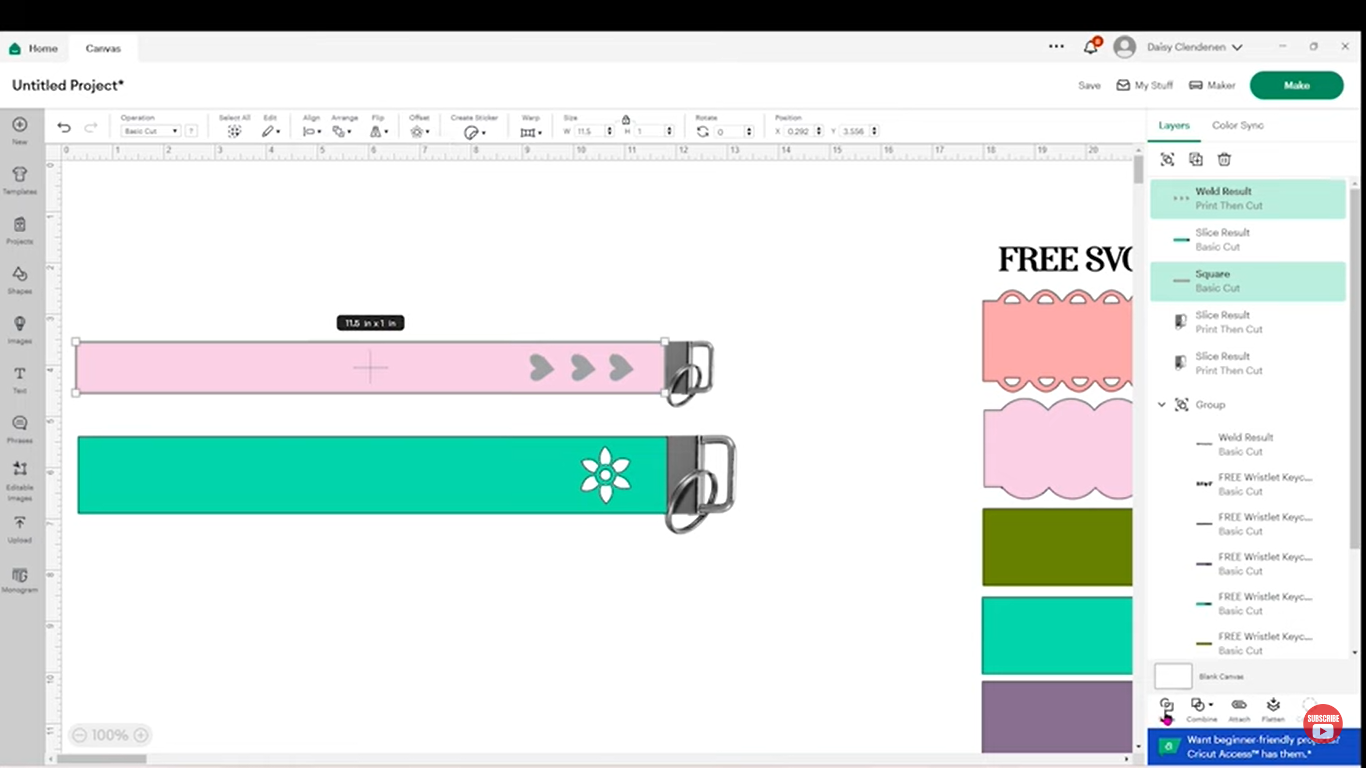
You have the templates on the Cricut DS canvas. Select the group of templates and click ungroup. Decide which template or templates you want to cut and delete or hide the others. Just leave the template or templates you are going to cut at that time. Then change the size. The size of the template will depend on the size of the keychain clamp, which can be 1, 1.5 and 2 inches.

Create Template On the CDS Program
Now I’ll quickly show you how to create your own template. In the menu on the left select the square figure.

Draw a rectangle on the canvas and change its measurements. The size of the template will depend on the size of the keychain clamp, which can be 1, 1.5 and 2 inches.

If you want, you can incorporate designs into the patterns, adding the design and sending it to the front, adjusting the size, then selecting the two layers, aligning it to the vertical center and then using the slice option.

You can also change its color if you wish. Now you have the templates with the design and we are ready to cut.
I’m going to proceed to cut the keychains. First I will cut keychains using genuine leather and lastly I will cut keychains using faux leather. It is important to define in advance what material we are going to use to later choose the materials to cut. If it’s ready, press MAKE.

Place each of the designed keychains in the center of the pad, in this case between rows 5 and 6.

How to Cut Genuine Leather with Cricut
Press the continue option to choose the materials you are going to cut, then browse all materials, all categories and select our material from the drop-down list. In this case we will start cutting genuine leather.


Then in step number 1 we select the pressure, applying in this case the more pressure option and in step number 2 to cut the genuine leather we will use the deep cut knife, this knife can be used in the Cricut Maker or Cricut Explore. This means that genuine leather can be cut with either of these two pieces of equipment.

Once the above is done we go to the Cricut machine. Before cutting the material you must place all the rings to the right.

To cut genuine leather, we are going to use the deep point blade.

Place the leather on the cutting mat in the center, in the same position as you did with the template on DS and with the smooth side down, make sure it sticks well. For both genuine and synthetic leather you will use the purple cutting mat.

Proceed to cutting by placing the pad on the Cricut machine.

It already made the cut in genuine leather and made a very defined cut.

How to Cut Faux Leather with Cricut
Change the material type in the search materials option, all categories and select faux suede.

Then in step number 2 to cut the synthetic leather we will use the rotary blade.

Place the leather on the pad in the same way as genuine leather, with the smooth side facing down, change the blade into the machine and place the pad with the leather to proceed to cutting.

And this is how it cut the synthetic leather using the rotary blade.

Assembling the Wristlet Keychains
We will use the clamps and the pliers, place the clamp inside the pliers, fold the leather and place it well aligned inside the clamp, then close by pressing with the pliers to leave it securely fastened.


If you wish, you can personalize them with Iron On and embellish them by adding other accessories. If you want to customize them with Iron On, I recommend doing that process before assembling them.
Personalizing Leather Wristlet Keychains with Iron On
You can cut regular or glitter Iron On with your Cricut machine.

Align the Iron On design on the leather strips, place a piece of butcher paper on top and press it at 315 degrees Fahrenheit for 20 seconds. And so we have the personalized leather strips to then assemble the keychains. Afterwards you can also embellish them with the accessories of your choice. I use keychain tassels that I ordered on Amazon.


Final Result: How to Cut Leather with Cricut | How to Make Leather Keychains
Voila, They are gorgeous!
Wristlet keychains look beautiful, whether you make them with genuine or faux leather.

Now that you know how to cut leather and how to make bracelet keychains with Cricut, you can make your own creations that are ideal for personal use, gifts, or to add to the product portfolio of your craft business.
I hope you found this tutorial on using the Cricut helpful. If you liked it, I encourage you to subscribe to my blog and YouTube channel to be aware of future content. Also, I’d love to see your creations! Don’t hesitate to share them on my social networks so I can admire your beautiful projects. Thank you for following me on this creative adventure!
Enjoy creating!
Daisy
Explore my blog to Learn all About my Tutorials and FREE Downloadable Files

Is the xTool Printer Worth It for Small Apparel Businesses?
The xTool Apparel Printer offers a promising solution for custom apparel business owners, addressing the limitations of traditional methods. Its automated maintenance, ease of setup, and capability to print vibrant designs on various fabrics make it a strong option for both beginners and established entrepreneurs. Initial print quality impresses, enhancing business potential.

HTVRONT A100 Review: The Ultimate 3-in-1 Heat Press System
HTVRONT A100 Auto Multi Heat Press Review | My Experience Using This 3-in-1 Heat Press for Hats, Tumblers, DTF & Sublimation If you run a custom products business, you already know how quickly your workspace can become crowded with multiple heat presses for different projects. One machine for shirts. Another one for tumblers. Another one…

Unlock Creative Potential with the PYDLife V20 Sublimation Oven
Why the New PYDLife V20 Sublimation Oven Is a Total Game Changer for 3D Sublimation If you’ve been in the sublimation world for a while, then you already know how important it is to have equipment that not only works well, but also saves time, allows bulk production, and opens the door to more creative…
Subscribe to My Blog
- All Posts
- Baking – Cooking – Cocina
- Birthday DIY Cumpleaños
- Books – Libros
- Boxes – Cajas
- Cards DIY Tarjetas
- Carpinteria – Woodwork
- Christmas – Navidad
- Christmas Decorations – DIY
- Craft for Business – Manualidades para Negocio
- Craft Software Tutorials – Programas
- Craft Tutorials
- Cricut Crafts & Tutorials
- Custom Items DIY Pesonalizados
- DTF
- Easter – Pascua
- Embroidery – Bordado
- Fabric Face Masks
- Fall Decor – Otoño
- Flowers – Flores
- Free Patterns – Patrones
- FREE SVG PNG Designs – GRATIS
- FREE SVG | PNG | Cutting Files
- Gifts
- Graduation
- Halloween
- Halloween crafts
- Home Decor
- HTVRONT
- Kitchen
- Laser Engraver
- Latino Hispanic
- Loklik
- Metal Stamping
- Mugs
- Navidad
- Profitable Business – Negocio Rentable
- Recipes – Recetas
- Reviews
- San Valentin
- school craft
- Screen Printing
- Sewing
- sewing patterns
- Sewing Tutorial – Costura
- Shipping Ideas
- Small Business – Pequeños Negocios
- Sublimation
- T-Shirts – Camisetas DIY
- Templates
- Thank You Cards
- Valentine's Day